Linking Database Tables in Advanced Reports
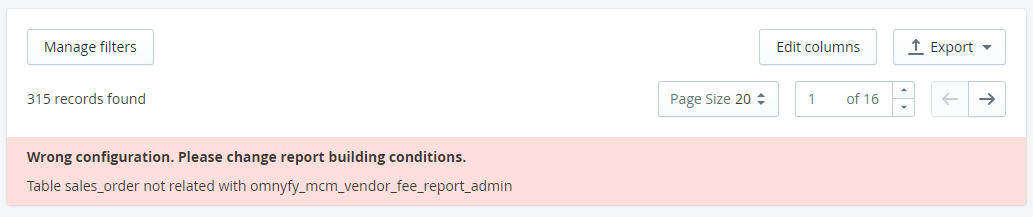
This is only required if you are managing custom reports. Some fields though available to select from the attributes selection need to be linked together for the report to display properly (eg MCM attributes). In such cases, if you select a field that is not already linked, you will see this error message appear when you try to load the report (depending on the report you copied from already).
Understanding tables
Reports are generated based on a certain table in the database, taken from what report you copied it from originally. If you copied a sales report, it will use the sales_order table as the main table (the same will be if you copied a product or customer report). Some tables are linked together already (such as sales_order and sales_order_item).
Each of these tables will have certain attributes - for example; sales_order will have the Order number and Grand Total, where as sales_order_item will have the data about each individual product, such as Product Name and Individual Row Total.
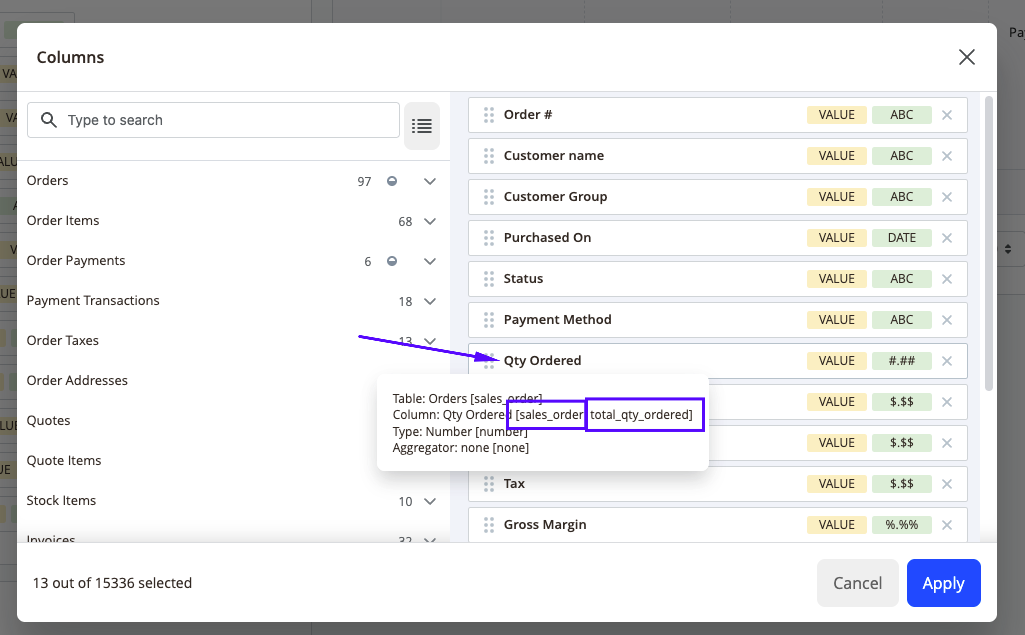
If you hover over an attribute when editing a report, you can see how this relates.
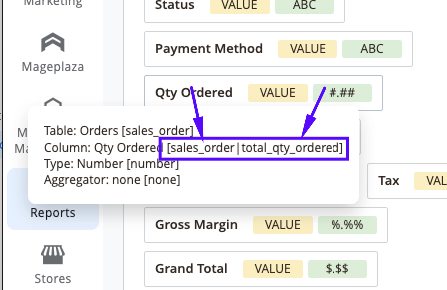
You can see this in the Advanced mode where the table appears on the left of the divider, while the attribute appears to the right.
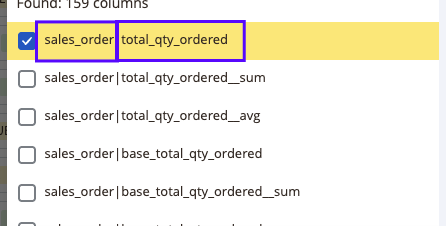
You can also confirm what you have already included in the report by hovering over the attribute on the right column.
Linking the tables via Config Builder
In the Advanced report, you can use the Config Builder to link a table's relationship by finding the attributes that link them together via XML code. For example, we need to make a link between the omnyfy_mcm_marketplace_fee_report_admin and the sales_order table.
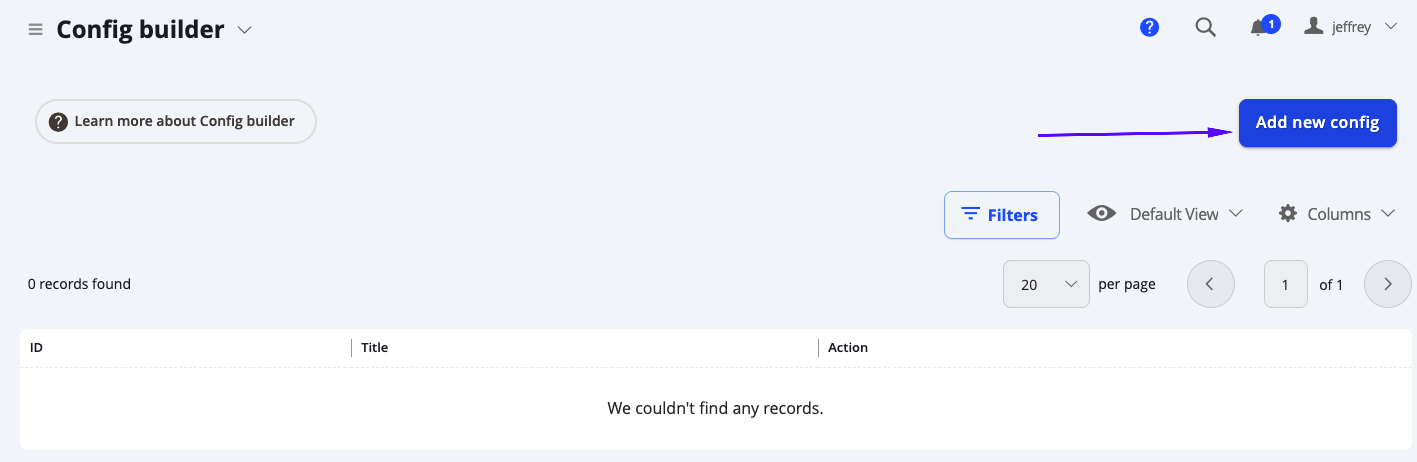
- Access the Advanced Reports Config Builder by navigating to Reports > Advanced Reports > Config Builder.

-
The page will load with a grid of any existing configurations / links you have added. Select Add New Config from the top right of the page.
-
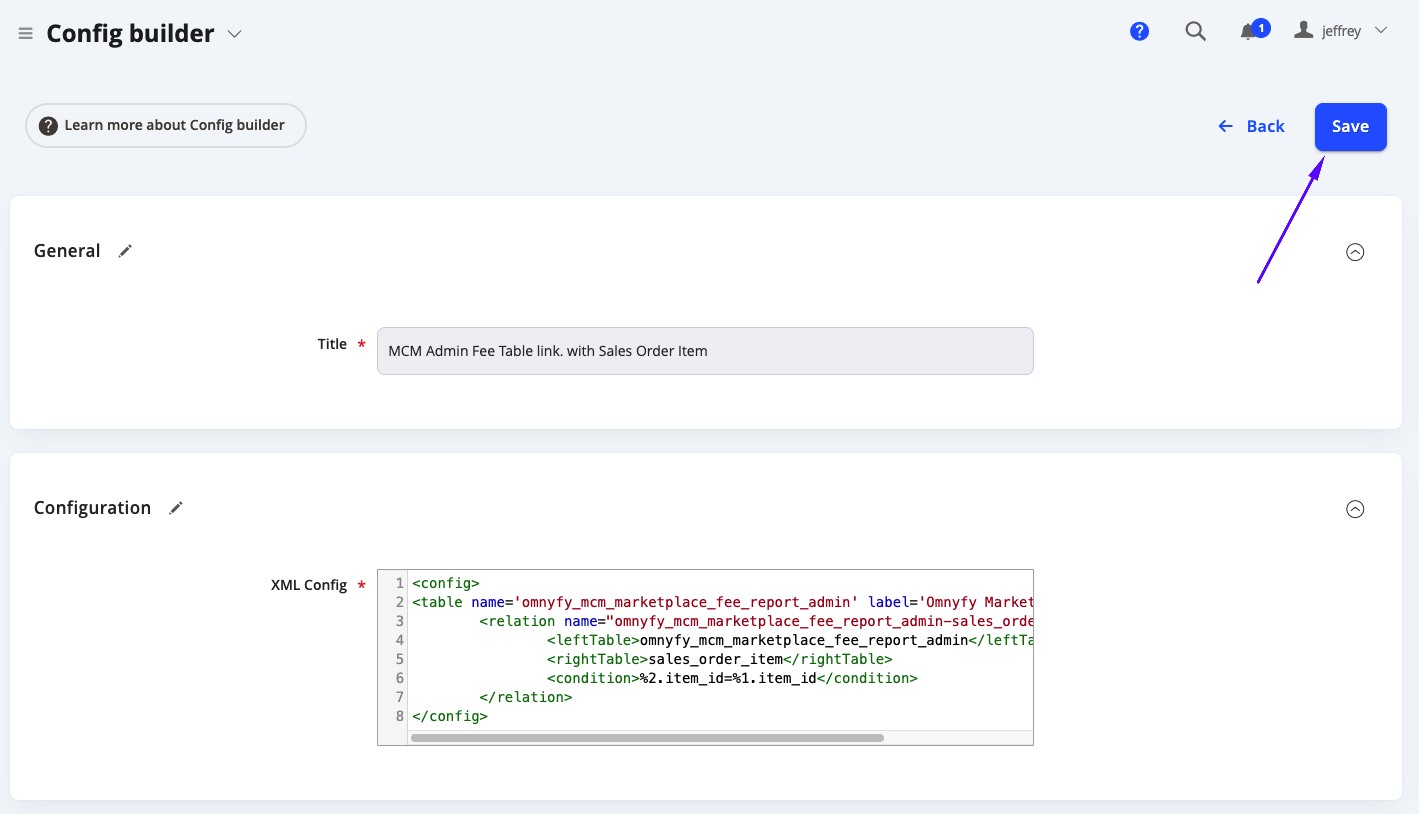
This page will include 2 fields - fill these in to create the configuration.
Field Notes Title This will be the name of this configuration. XML Config This will be where you can input the XML Code to link the tables. See below for an example.
-
Select Save from the top right of the page once you have finished. You can then check the report to see if you can input the attributes.
Creating the XML Config code
Here we will need to have a reference for the tables. Using the same example of the omnyfy_mcm_marketplace_fee_report_admin and the sales_order table linking - in this case we will be linking it with sales_order_item (since the omnyfy_mcm_marketplace_fee_report_admin attributes match the sales_order_item rather than sales_order - and sales_order_item already links to sales_order so it will still match fine).
XML Config example:
<config>
<table name='omnyfy_mcm_marketplace_fee_report_admin' label='Omnyfy Marketplace Fee' />
        <relation name="omnyfy_mcm_marketplace_fee_report_admin-sales_order_item" type="number">
                <leftTable>omnyfy_mcm_marketplace_fee_report_admin</leftTable>
                <rightTable>sales_order_item</rightTable>
                <condition>%2.item_id=%1.item_id</condition>
        </relation>
</config>
The config must start with "
| Parameter | Notes |
|---|---|
| config | This is the document element, e. g. all other tags should be contained inside it. |
| table | Defines a table in which the new synthetic field should be added |
| -- name | Name of that table, which should be given without your table prefix. This means that if you have in your database a prefix like mage_ and real table name mage_sales_order, you need to enter here just sales_order. |
| -- group | Name of a group, under which this table appears in the Report Builder. Default values: Sales, Products, Customers, Categories, Other. Tables without an explicitly set group will fall into the Other group. |
| -- label | This is the label on a table that is used in identifying a table. |
| relation | This determines how to link different tables to build reports that includes multiple tables. The connection between the two or more tables is called a table relationship. |
| column | Defines how a column should be calculated |
| -- name | Input the unique name of the column, MySQL-compatible. |
| -- label | Input the name that will be displayed on the Report. |
| -- type | Data type that will display its value. The supported types are: money, country, date, qty, number, select, percent, store, and str. |
| -- fields | This is a comma-separated list of fields, which will be used in calculations. |
| -- expr | This attribute contains MySQL expression to calculate field value. You can use placeholders, where %1 corresponds to the first field in previous attribute, %2 - to second and so on. |
| -- options | Non-mandatory attribute where the data type select or country is used. Here you need to enter either the full name or the class which implements method to OptionArray for this column. |
- In this case, we are referencing the omnyfy_mcm_marketplace_fee_report_admin table in .
- The relationship name is based on the two tables we are linking "omnyfy_mcm_marketplace_fee_report_admin-sales_order_item" and the type of values in it (which in this case is a **number**). This is referenced in "<relation name="omnyfy_mcm_marketplace_fee_report_admin-sales_order_item" type="number">".
- We are referencing that the left table is the omnyfy_mcm_marketplace_fee_report_admin table, and the right table is sales_order_item. This is referenced in and .
- The condition using the following expression is that based on the right table (%2), the attribute "item ID" (.item_id) matches the left table (%1) attribute "item ID" (.item_id). This is referenced in
%2.item_id=%1.item_id .
Once this is saved, you will then be able to reference from the omnyfy_mcm_marketplace_fee_report_admin table in any sales report.
NOTECurrently, some flat tables are not supported in the reports. You will be able to identify which is a flat table if it contains "flat" in the table name.